Поездка во Францию в апреле
Франция. Как много стоит за этим словом. Сразу представляется Париж и Эйфелева башня, багеты и вкусное вино, улитки и лягушачьи лапки, пасторальные пейзажи и зеленые виноградники. Для нас поездка в эту страну являлась must have, но никогда не была в приоритете. Романтичных чувств Франция никогда не вызывала, скорее было просто интересно, что же такого в ней находят десятки миллионов туристов каждый год. Поэтому ожиданий не было никаких, а точнее сказать, мы даже всерьез думали не ехать, так как спланировали поездку на апрель в январе, и чем ближе было к отпуску, тем больше нам туда не хотелось. Сказалось также мини-путешествие в Бельгию, где нам совсем не понравилось, поэтому решили, что Франция будет еще хуже - страны же соседские. В конце концов решили ехать, хоть что-то хорошее точно будет, да и хочется составить собственное мнение о стране.
Спойлер: мы были не правы.

Маршрут и карта
Наш маршрут, конечно же, начинался с Парижа и длился всего 7 дней. 4-5 дней мы отвели столице, и 2-3 дня мы хотели провести в Руане — столице Нормандии — с посещением северного побережья. Мы предпочитаем поездки на общественном транспорте, поэтому в этой статье ничего не будет про автомобильные путешествия.
Ниже, как обычно, прикладываю нашу гугл карту. На ней отмечены самые значимые места: некоторые стоит посетить, другие нам просто понравились, где-то было вкусно. Карта не претендует на полноценный справочник, в ней есть множество белых пятен. Берите ее и дополняйте для себя, меняйте ее под свои интересы и нужды. Карта иллюстрирует данную статью и места, про которые я буду в ней писать.
Введение
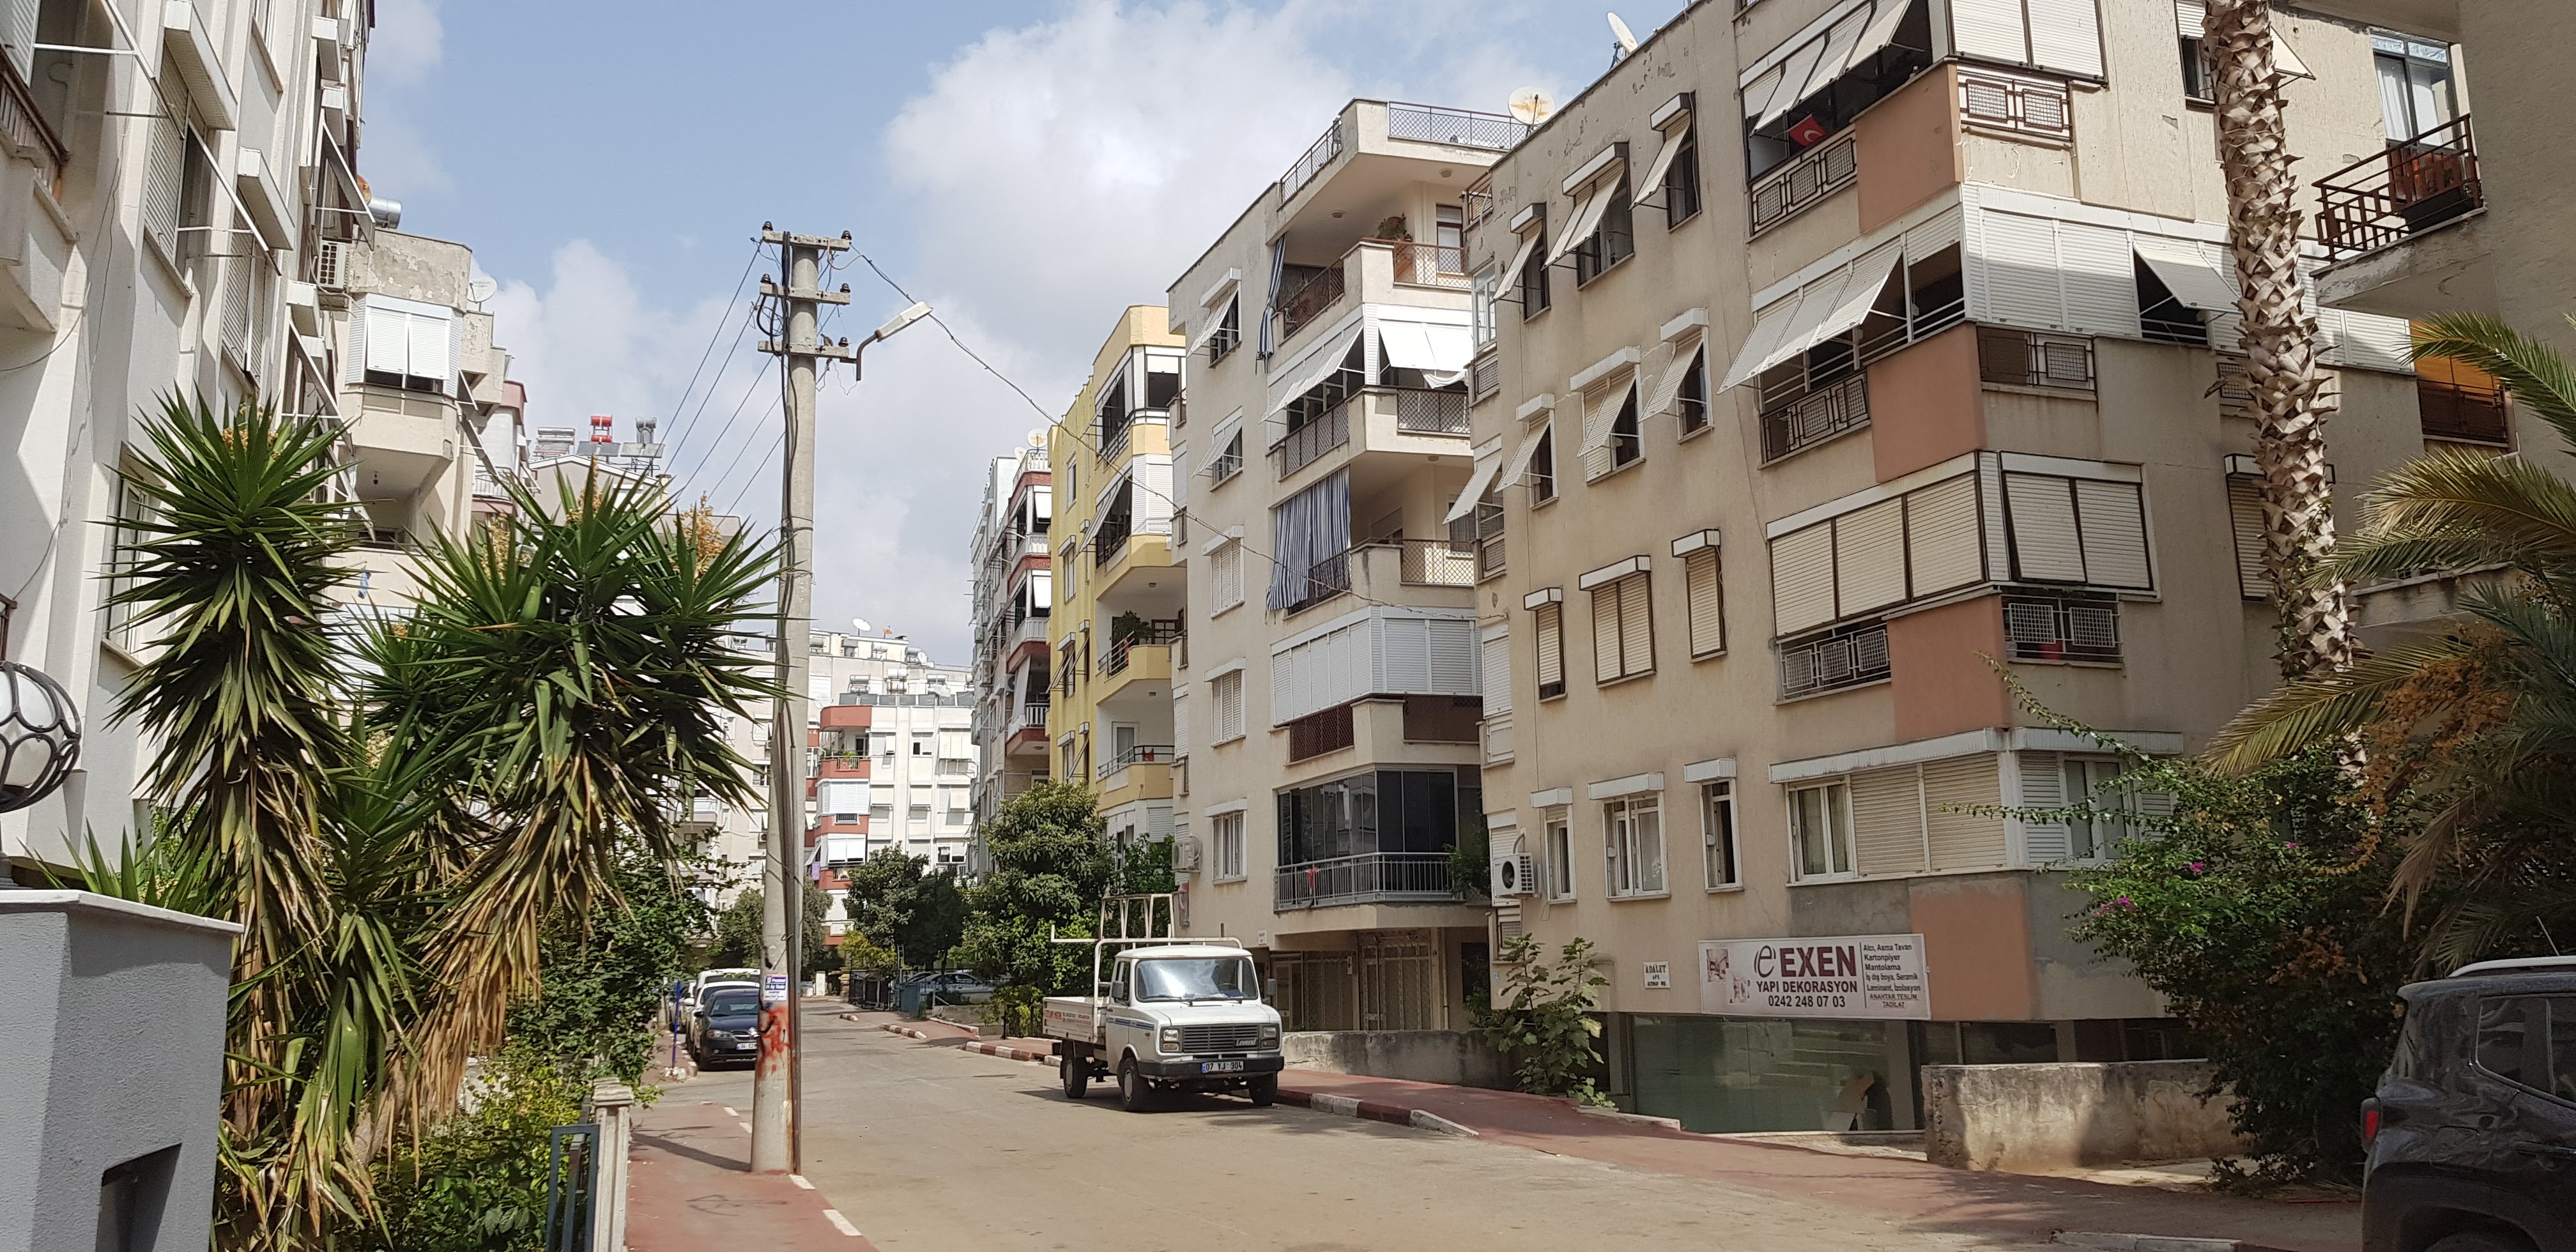
Многие считают Турцию низкосортной страной для туризма, и очень зря. В этой статье я расскажу вам про всего лишь один город - Анталию, город чудесный, в который хочется возвращаться. Надеюсь, получится рассказать так, что вам захочется туда съездить и повторить что-то из моего опыта, которым я делюсь тут.
Как и прежде: для меня лучшей наградой будет то, что я писал все это не зря, и что кто-то воспользовался моими советами или лайфхаками. Если что-то получилось и вам зашло, я очень рад!
В Турции я был третий раз. Первый раз в Кемере, второй раз в Анталии в апреле 2019, а третий раз решили повторить с Мариной в этом году по простой причине: в коронавирусном 2020-м году это была практически единственная привлекательная страна, куда можно было поехать из России. Нам понравилась прошлогодняя поездка, и мы решили повторить впечатления и на этот раз поехать туда на месяц. Снять квартиру, готовить еду, иногда ходить по ресторанам, отдыхать в приятном климате и наконец немного отвлечься от грустных новостей, оказавшись в другом мире. Практически полгода мы работали без отпусков, и за эти полгода было ужасно мало впечатлений, и хотелось наверстать упущенное. 24 сентября мы вылетели из Питера.
TL;DR Google Карта
Почти все те места, которые я рекомендую посетить и увидеть ниже, я отметил на Google карте. Также я указал наиболее понравившиеся кафе, ресторанчики и магазины. Это поможет вам сориентироваться.
Почему стоит выбрать Анталию
Я не буду откладывать и расскажу сразу факты, почему мне так понравился этот город, и почему я бы вернулся туда еще раз и также надолго.
Месяц назад вернулся из небольшого отпуска, проведенного в городе Лимассол на солнечном острове Кипр. Расскажу о впечатлениях, об основных лайфхаках, которые мы узнали за время пребывания там, где остановились, ну и конечно поделюсь своей Google картой этого города.
Google карта Лимассола
Не буду тянуть и поделюсь картой сразу.
Эту карту мы составляли на основе рекомендаций моих коллег, живущих и работающих в Лимассоле. Они мне дали список различных заведений, где можно, по их мнению, вкусно поесть или выпить, а я их нанес на карту. Также мы добавили различные значимые места, которые во многих гидах советуют посетить и посмотреть.
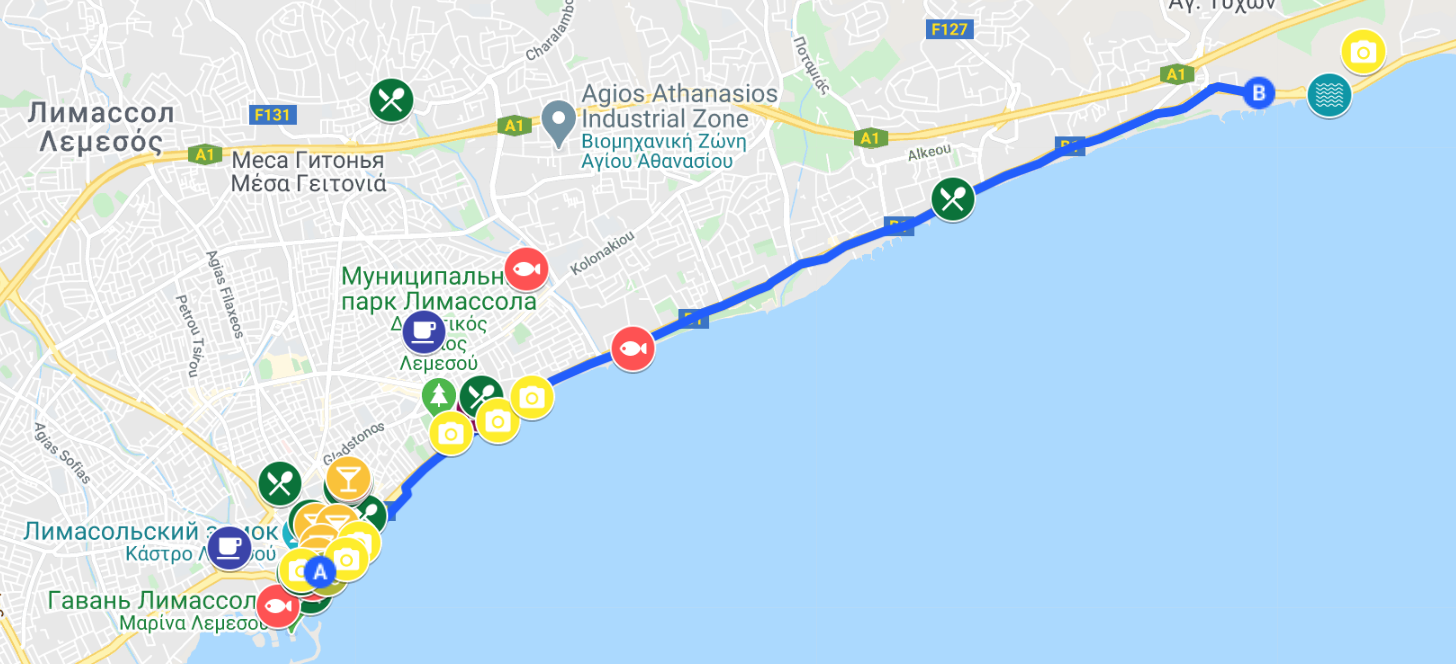
У каждого места своя иконка, и если нажать на нее, то откроется дополнительное описание, в котором указаны некоторые подробности данного места: почему оно добавлено на карту, примерные часы работы, особенности.
Вот ссылка на карту.
Идея поездки
После нашего милого 3-дневного отдыха в Гданьске мы тут же начали планировать следующую поездку. Выбрали только примерное время для поездки - конец февраля - начало марта. К концу января настолько преисполнились питерской погодой, что решили: хотим солнце и тепло. Понятно, что речи о +30 градусах не было, потому что:
- Такая температура в феврале доступна лишь в Азии, а мы все еще хорошо помним опыт Вьетнама
- Далеко лететь не хочется
- Надолго лететь тоже
Поэтому выбирали из доступных стран: Египет, Тунис, ОАЭ. Также смотрели на Vandrouki - вдруг что-то интересное подвернется. Начали искать выгодные билеты на Aviasales в указанные локации со сдвигом +-2 дня. Ничего хорошего не нашли, и на карте подвернулся взгляду Кипр. Я спросил у своих коллег, работающих на острове (у Семраша офис в Лимассоле), не слишком ли я псих, что думаю поехать отдохнуть ненадолго на Кипр, на что мне ответили, что март - отличное время для путешествий по острову.
Обещали +17 днем, +12 ночью, солнышко. Холодновато, но зато не жарко и самое то, чтобы пешком везде гулять и всё-всё смотреть.
После этого нам сразу удалось найти сравнительно недорогие билеты в Ларнаку (один из двух основных аэропортов острова. Второй - Пафос. Они примерно равнозначны, и иногда полезно посмотреть рейсы в оба города, они разные) за 28 тысяч рублей. Но с пересадкой в Москве. Мы взяли эти билеты, и начался поиск отеля.
Хочу поделиться тем, как мы съездили в конце ноября в Гданьск, Польшу.
Хочется постоянно путешествовать
Как-то так получается, что каждый раз когда мы в отпуске в другой стране, еще не вернувшись домой, мы уже думаем о том, куда поедем дальше. Просто это так здорово - сама поездка заграницу, знакомство с новой страной, культурой, людьми, общественным транспортом, продуктами, обычаями и, конечно, кухней. И когда мы были в Италии в свадебном путешествии в конце сентября, уже тогда начали планировать следующую поездку.
Так как Италия - это вообще не дешевая страна, а мы старались не экономить на отдыхе в ней, так как давно мечтали об этой поездке (и наши мечты оправдались), то следующее путешествие решили сделать бюджетным, и не оттягивать, а поехать как можно раньше. Так как у нас нет ни кредита, ни ипотеки, ни ребенка (вот сейчас как-то все это грустно прозвучало немного :) ), но есть деньги (а вот это уже повеселее), сейчас можно ездить куда угодно и практически когда угодно, и мы решили этим пользоваться по максимуму - поездить мир посмотреть, потому что это реально стоит того и стоит своих денег.
Today I want to tell you how to migrate from MySQL Percona Server 5.6 to Percona Xtradb Cluster.
My initial configuration was:
- standard mysql master-slave replication
- node1 is a master
- node2 is a slave
Now I need to setup master-master replication for failover purposes. But before all we need to add one more server in our configuration. I choose a scheme where only two mysql-servers act as primary and the third acts as an arbitrator and doesn’t store any data, because percona has synchronous replication (what means a data is not written at all while it is not written on ALL nodes in cluster) and the latency of a cluster is equal to latency of the slowest node in the cluster, I don’t want add one more point of possible latency and don’t need to store a third replica of a data. So on the third node I will just install and configure Galera Arbitrator. I hope you understand purposes, why you should have minimum 3 members in cluster (hint: avoiding split-brain).
Our action plan consists of these parts:
- Update a slave to xtradb node
- Setup xtradb cluster on the slave node continuing to receive any updates from master
- Configure Galera Arbitrator on a third node (node3) and join it in cluster with node2
- Check that wsrep works
- Shutdown an application targeting on master mysql node
- Monitor a replication lag, wait until it disappears.
- Stop and reset slave node (node2)
- Point the application to node2
- Update the former master to xtradb node
- Join node1 into cluster
Let’s begin.
Before all works please shure that your replication works fine and the data really replicates. You can use command:
mysql -u root -e 'show slave status\G;'
Update a slave to xtradb node
systemctl stop mysql
apt-get remove percona-server-server-5.6 percona-server-client-5.6
apt-get install percona-xtradb-cluster-server-5.6
After these steps mysql database should normal start. If you have some similar output and mysql doesn’t start:
Building dependency tree...
Reading state information...
percona-xtradb-cluster-server-5.6 is already the newest version.
The following packages were automatically installed and are no longer required:
  libhtml-template-perl libio-socket-ssl-perl libnet-libidn-perl
  libnet-ssleay-perl libperconaserverclient18.1 libterm-readkey-perl
  percona-server-common-5.6
Use 'apt-get autoremove' to remove them.
0 upgraded, 0 newly installed, 0 to remove and 22 not upgraded.
1 not fully installed or removed.
After this operation, 0 B of additional disk space will be used.
Setting up percona-xtradb-cluster-server-5.6 (5.6.37-26.21-3.jessie) ...


 * Percona XtraDB Cluster is distributed with several useful UDF (User Defined Function) from Percona Toolkit.
 * Run the following commands to create these functions:

        mysql -e "CREATE FUNCTION fnv1a_64 RETURNS INTEGER SONAME 'libfnv1a_udf.so'"
        mysql -e "CREATE FUNCTION fnv_64 RETURNS INTEGER SONAME 'libfnv_udf.so'"
        mysql -e "CREATE FUNCTION murmur_hash RETURNS INTEGER SONAME 'libmurmur_udf.so'"

 * See http://www.percona.com/doc/percona-xtradb-cluster/5.6/management/udf_percona_toolkit.html for more details


Job for mysql.service failed. See 'systemctl status mysql.service' and 'journalctl -xn' for details.
invoke-rc.d: initscript mysql, action "start" failed.
dpkg: error processing package percona-xtradb-cluster-server-5.6 (--configure):
 subprocess installed post-installation script returned error exit status 1
Errors were encountered while processing:
 percona-xtradb-cluster-server-5.6
E: Sub-process /usr/bin/dpkg returned an error code (1)
Remove newly installed Percona packages and libmysqlclient and then reinstall the packages:
root@node2:~# dpkg --get-selections | grep -i mysql
libdbd-mysql-perl    install
libmysqlclient18:amd64    install
mysql-common     install
root@node2:~# apt-get remove percona-xtradb-cluster-client-5.6 percona-xtradb-cluster-server-5.6 libmysqlclient18
This hint should you help. After mysql has been started, check replication status, that all works as expected. Now we will configure the node2 as a 1 node cluster. 2. Setup xtradb cluster on the slave node continuing to receive any updates from master Create and open file named /etc/mysql/conf.d/pxc_cluster.cnf and write the next configuration:
[mysqld]
binlog_format = ROW
default_storage_engine = InnoDB
innodb_autoinc_lock_mode = 2
innodb_locks_unsafe_for_binlog = 1
wsrep_cluster_address = gcomm://
wsrep_cluster_name = my_unicorn_cluster
wsrep_node_address = 10.13.200.2
wsrep_node_name = node2
wsrep_provider = /usr/lib/libgalera_smm.so
wsrep_sst_auth = sst:secret
wsrep_sst_method = xtrabackup-v2
All important parameters are described here. Several of them I will explain:
wsrep_cluster_address - cluster address. Here we defined no IP address, which means that node is allowed to build a cluster all by itself alone. Later we will change this parameter.wsrep_node_address - node2’s IP.wsrep_sst_auth - the most important setting, which could save your time later. For a SST (state snapshot transfer - actually just a full backup) we need create a user on future primary (alone) node2, which will be the first node in the cluster. It’s obvious, that sst is its name and secret is its password.wsrep_sst_method - to make, transfer and apply a snapshot on donor (in our case this would be node2) and joiner node (current acts as a master, would be node1) I’m using xtrabackup-v2. You can choose different methods, but then configuration can different.
Okay, now restart mysql and apply the changes.
We need to do the last 2 things: create a mysql user sst with proper privileges and check our cluster state.
To create the user execute following SQL-commands:
mysql@node2> CREATE USER 'sstuser'@'localhost' IDENTIFIED BY 'secret';
mysql@node2> GRANT PROCESS, RELOAD, LOCK TABLES, REPLICATION CLIENT ON *.* TO 'sstuser'@'localhost';
mysql@node2> FLUSH PRIVILEGES;
Our ex-slave now is fully ready.
To decrease possibly cluster latency due to disk I/O and network latency the node3 will be set as a Galera Arbitrator.
Install percona-xtradb-cluster-garbd-5.7:
apt-get install percona-xtradb-cluster-garbd-5.7
Change file /etc/default/garbd:
# Copyright (C) 2012 Codership Oy
# This config file is to be sourced by garb service script.

# A comma-separated list of node addresses (address[:port]) in the cluster
GALERA_NODES="10.13.200.2:4567"

# Galera cluster name, should be the same as on the rest of the nodes.
GALERA_GROUP="myreports_rc"

# Optional Galera internal options string (e.g. SSL settings)
# see http://galeracluster.com/documentation-webpages/galeraparameters.html
# GALERA_OPTIONS=""

# Log file for garbd. Optional, by default logs to syslog
# Deprecated for CentOS7, use journalctl to query the log for garbd
# LOG_FILE=""
Don’t forget to remove a line in the file, else garbd will not start:
# REMOVE THIS AFTER CONFIGURATION
Start a daemon:
journalctl -u garbd will show you the daemon logs and can be used for debug info.
At this point we have two nodes in xtradb cluster (node2 and node3). node2 is also still a slave of master node1. node3 at the same time has no data and is just an arbitrator.
Check that wsrep works
Now we should check that xtradb cluster works, consists of two nodes and node1 still receive any updates from master.
I recommend you to use an autility named  . Running
 ./myq_status wsrep we can see some useful info like this:
root@node2:/opt/myq_tools# ./myq_status wsrep
my_unicorn_cluster / node1 (idx: 1) / Galera 3.21(r8678538)
Wsrep    Cluster  Node Repl  Queue     Ops       Bytes     Conflct   Gcache    Window        Flow
    time P cnf  # Stat Laten   Up   Dn   Up   Dn   Up   Dn  lcf  bfa  ist  idx dst appl comm  p_ms
04:55:22 P  5  2 Sync   N/A    0    0  141  324 0.1M 0.2M    0    0  456  597   8    1    1  377k
04:55:23 P  5  2 Sync   N/A    0    0    0    0  0.0  0.0    0    0  456  597   8    1    1     0
04:55:24 P  5  2 Sync   N/A    0    0    0    0  0.0  0.0    0    0  456  597   8    1    1     0
Our cluster consists of 2 nodes (# column), has a status Sync and recieve some updates from master (Ops and Bytes columns). One more important column is cnf meaning a count the version of thec cluster configuration. This changes every time a node joins or leaves the cluster. Seeing high values here may indicate you have nodes frequently dropping out and rejoining the cluster and you may need some retuning of some node timeouts to prevent this.
This is a useful tool, which is good described in  . Check it out!
In addition, it is very important to look into the logs (depends on your mysql configuration it may be anywhere but often they are placed in /var/log/mysql/error.log). This log is really informative and useful. Don’t forget it.
Shutdown an application targeting on master mysql node
Now you need to shutdown an application, that writes into master node.
Monitor a replication lag, wait until it disappears.
To guarantee, that the slave has consistent and latest data we need to be sure, that there is NO replication lag.
Take a look on table checksums on master and slave running query:
mysql> select * from percona.checksums;
Values in columns this_crc and this_cnt should not be different from the values in columns master_crc and master_cnt.
You can also run a query, which will show a different between nodes:
node3> SELECT db, tbl, SUM(this_cnt) AS total_rows, COUNT(*) AS chunks
    FROM percona.checksums
    WHERE (
    master_cnt <> this_cnt
    OR master_crc <> this_crc
    OR ISNULL(master_crc) <> ISNULL(this_crc))
    GROUP BY db, tbl;
Empty set (0.00 sec)
An empty set means there is no difference.
Stop and reset slave node (node2)
Disable the replication:
node2> slave stop;
node2> reset slave;
Point the application to node2
Change app config, now “master” is node2.
The process doesn’t different from the process of upgrading node2.
Join node1 into cluster
This item of the action plan can be difficult.
- Start mysql
- If all is OK mysql will start normally and you node1 is getting a new master with a full copy of data from node2
But there could be, that SST doesn’t work. This can happen baecause of a variety of reasons. I will now give you a silver bullet, but I can help you by pointing out the main points:
- /var/log/mysql/error.log is really useful. Check this log carefully on both nodes.
- to join the cluster a node must first perform SST (in our case) - make a snapshot from master and apply it itself. To do it a user and his password in mysql must be exactly the same how in the conf file. Besides the user must have all described above privileges to perfom a backup.
- while performing a xtrabackup on node2 (current master in xtradb cluster) a log file placed /var/lib/mysql/innobackup.backup.log is written. Check it for errors. NOTE: Please check that the backup run completes successfully. At the end of a successful backup run innobackupex prints “completed OK!”.
- check also /var/lib/mysql/innobackup.prepare.log on node1 for errors
- don’t forget use myq_status
If the node successfully joined the cluster, reeive my congratulations. Now you have master-master replication.
In the end create mysql user sstuser on node1 and grant him needed privileges (if he doesn’t exist).
NOTES and LINKS:
- I didn’t use a firewall in the tutorial
 really helpes me. By this article I decided to add and expand it.
- https://www.percona.com/doc/percona-xtradb-cluster/LATEST/howtos/garbd_howto.html
- https://www.percona.com/doc/percona-toolkit/3.0/installation.html
- https://www.percona.com/doc/percona-xtradb-cluster/LATEST/howtos/singlebox.html
- https://www.percona.com/blog/2013/01/09/how-does-mysql-replication-really-work/
- https://www.percona.com/blog/2012/11/26/realtime-stats-to-pay-attention-to-in-percona-xtradb-cluster-and-galera/
- https://www.percona.com/doc/percona-xtradb-cluster/LATEST/features/multimaster-replication.html
- https://www.percona.com/blog/2017/02/07/overview-of-different-mysql-replication-solutions/
It may happens that a CPU frequency on a server under load may be lower than you expect.
Check it out:
[coma][rrb][~] # cat /proc/cpuinfo | grep -c processor
8
[coma][rrb][~] # cat /proc/cpuinfo | head -n 25
processor : 0
vendor_id : GenuineIntel
cpu family : 6
model : 94
model name : Intel(R) Xeon(R) CPU E3-1230 v5 @ 3.40GHz
stepping : 3
microcode : 0xa6
cpu MHz : 800
cache size : 8192 KB
physical id : 0
siblings : 8
core id : 0
cpu cores : 4
apicid : 0
initial apicid : 0
fpu : yes
fpu_exception : yes
cpuid level : 22
wp : yes

flags : fpu vme de pse tsc msr pae mce cx8 apic sep mtrr pge mca cmov pat pse36 clflush dts acpi mmx fxsr sse sse2 ss ht tm pbe syscall nx pdpe1gb rdtscp lm constant_tsc art arch_perfmon pebs bts rep_good nopl xtopology nonstop_tsc aperfmperf eagerfpu pni pclmulqdq dtes64 monitor ds_cpl vmx smx est tm2 ssse3 sdbg fma cx16 xtpr pdcm pcid sse4_1 sse4_2 x2apic movbe popcnt tsc_deadline_timer aes xsave avx f16c rdrand lahf_lm abm 3dnowprefetch epb intel_pt tpr_shadow vnmi flexpriority ept vpid fsgsbase tsc_adjust bmi1 hle avx2 smep bmi2 erms invpcid rtm mpx rdseed adx smap clflushopt xsaveopt xsavec xgetbv1 xsaves dtherm ida arat pln pts hwp hwp_notify hwp_act_window hwp_epp

bugs:
bogomips : 6816.00
clflush size: 64
cache_alignment: 64
address sizes : 39 bits physical, 48 bits virtual
There is a physical blade server with 4 cores, every single one has 2 threads. Wee are seeing that the designated frequency of one CPU is 3.40GHz. But the real frequency, as we can see, is 800 MHz.
Checking the current frequency of the rest part of cores:
[coma][rrb][~] # cat /proc/cpuinfo | grep MHz
cpu MHz : 800
cpu MHz : 800
cpu MHz : 800
cpu MHz : 800
cpu MHz : 800
cpu MHz : 800
cpu MHz : 800
cpu MHz : 800
Every core has the same frequency - 800 MHz. Okay, maybe the server is not strongly used. Let's load it by using dd command and useless bytes transfer:
dd if=/dev/zero of=/dev/null
But frequency didn't grow to its optimal values and is staying on the same place. Checking other blades in the same platform (chassis). Looks like they all are affected by this problem. All have the frequency mush lower than it needs. Checking system logs doesn't help in this situation.
The real reason for this problem occurs at the hardware level, namely in the power supply.
Go to the server's ipmi management console, if you have it. There you will see an alerts about the power supply in events log like these:
8 2017/01/13 06:17:53 PS2 Status Power Supply Power Supply Failure Detected - Assertion
9 2017/01/13 09:27:17 PS2 Status Power Supply Power Supply Failure Detected - De-assertion
It tells that you need to replace a bad second power supply (PS2). After that all will be fine and all servers in the chassis will be fully operational.
NB. This is only my case and this solution may not suit everyone. The situation is really strange because a chassis has two power supplies ONLY for redundancy NOT for a parallel energy consumption. Each 2KW power supply fully provides enough energy for a chassis, which contains 12 blades. In the event of loss of one power supply, the performance of the server should not degrade. I think it's a bug of Supermicro (we use Supermicro Microcloud).
There is a problem with Linux kernel 3.16 (Debian Jessie) interacting with new versions of Docker (17.x). Sometimes a server running these versions of kernel and Docker Engine could stuck and don't answer on the users commands. The only way to solve this problem (server hanging) is rebooting the server.
To resolve this issue completely you should upgrade the kernel image from 3.16 to 4.X using jessie-backports.
1. Add a backports repository to sources list:
sudo bash -c 'echo "deb http://httpredir.debian.org/debian jessie-backports main contrib non-free" > /etc/apt/sources.list.d/backports.list'
2. Update your cache
sudo apt-get update
3. Find out a necessary versions of packages
Basically you need to install two packages - linux-image-4.x.x.bpo.x-{arch} and linux-image-amd64. You can check available versions of these packages using the commands:
apt-cache policy linux-image-amd64

apt-cache search linux-image-4
Sample output:
root@server:~# apt-cache policy linux-image-amd64

linux-image-amd64:

  Installed: 3.16+63

  Candidate: 3.16+63

  Version table:

  4.9+80~bpo8+1 800

        200 http://httpredir.debian.org/debian/ jessie-backports/main amd64 Packages

        100 /var/lib/dpkg/status

 *** 3.16+63 800

        500 http://ftp.us.debian.org/debian/ jessie/main amd64 Packages

        500 http://cdn.debian.net/debian/ jessie/main amd64 Packages

root@silver-cta1.semrush.net:~# apt-cache search linux-image-4
linux-headers-4.9.0-0.bpo.3-amd64 - Header files for Linux 4.9.0-0.bpo.3-amd64 linux-headers-4.9.0-0.bpo.3-rt-amd64 - Header files for Linux 4.9.0-0.bpo.3-rt-amd64 linux-image-4.9.0-0.bpo.3-amd64 - Linux 4.9 for 64-bit PCs ---------------------------output omitted-------------------------------------
4. Install kernel packages:
sudo apt-get install linux-image-amd64=4.9+80~bpo8+1 linux-image-4.9.0-0.bpo.3-amd64
5. Now you need to reboot the server.
After that check currently version of the kernel using dpkg or uname -a. If upgrade was successful you will see correct new package versions. Now start docker process
root@server:~# systemctl start docker

Job for docker.service failed. See 'systemctl status httpd.service' and 'journalctl -xn' for details.
Oops, what's going on?
journalctl -u docker

Oct 13 08:06:39 silver-cta3.semrush.net systemd[1]: docker.service start request repeated too quickly, refusing to start.

Oct 13 08:06:39 silver-cta3.semrush.net systemd[1]: Failed to start Docker Application Container Engine.

Oct 13 08:06:39 silver-cta3.semrush.net systemd[1]: Unit docker.service entered failed state.

Oct 13 08:13:46 silver-cta3.semrush.net systemd[1]: Starting Docker Application Container Engine...

Oct 13 08:13:46 silver-cta3.semrush.net docker[26423]: Command "daemon" is deprecated, and will be removed in Docker 17.12. Please run `dockerd` directly.

Oct 13 08:13:46 silver-cta3.semrush.net docker[26423]: time="2017-10-13T08:13:46.065379664-04:00" level=info msg="libcontainerd: new containerd process, pid: 26438"

Oct 13 08:13:47 silver-cta3.semrush.net docker[26423]: time="2017-10-13T08:13:47.066742860-04:00" level=warning msg="failed to rename /var/lib/docker/tmp for background deletion: %!s(<nil>). Deleting synchronously"

Oct 13 08:13:47 silver-cta3.semrush.net docker[26423]: time="2017-10-13T08:13:47.068803075-04:00" level=error msg="[graphdriver] prior storage driver aufs failed: driver not supported"

Oct 13 08:13:47 silver-cta3.semrush.net docker[26423]: Error starting daemon: error initializing graphdriver: driver not supported

Oct 13 08:13:47 silver-cta3.semrush.net systemd[1]: docker.service: main process exited, code=exited, status=1/FAILURE
We see an error message: error msg="[graphdriver] prior storage driver aufs failed: driver not supported". Hm, let me check is aufs is supported file systems by the kernel?
root@silver-cta1.semrush.net:~# docker info | grep "Storage Driver"

Storage Driver: aufs
root@silver-cta1.semrush.net:~# grep -E 'aufs|overlay' /proc/filesystems

nodev overlay
The kernel doesn't support docker storage driver. Kernel 3.16 supports aufs, but 4.X does not, BUT it supports now overlayfs, which is used by Docker too.
Next step can be dangerous for your existing images or containers. We are building docker images on deploy stage from base images downloaded from a docker hubs, so for us this operation is safe, because at any moment of rime we can build new images and create new containers. But I should note that you don't miss your files.
Execute the following command:
mv /var/lib/docker/aufs/ /var/lib/docker/aufs.old
And start the docker service. Service should start without problems. Now docker engine will use overlay2 as its default storage driver.
There is one solution, that helped me. You must install terminator from nightly repo. The full instruction is below.
Spoiler: after installing of new version most of your settings, which are responsible for how the terminator looks, will be changed.
1. Add the repo and update apt cache:
sudo add-apt-repository ppa:gnome-terminator/nightly-gtk3
sudo apt-get update
2. Install new version of terminator
apt-cache policy terminator

terminator:

  Installed: .98-1 500

  Candidate: 1.91-0~1779~ubuntu16.04.1

  Version table:

        1.91-0~1779~ubuntu16.04.1 500

        500 http://ppa.launchpad.net/gnome-terminator/nightly-gtk3/ubuntu xenial/main amd64 Packages

        500 http://ppa.launchpad.net/gnome-terminator/nightly-gtk3/ubuntu xenial/main i386 Packages

        100 /var/lib/dpkg/status

 *** 0.98-1 500

        500 http://ru.archive.ubuntu.com/ubuntu xenial/universe amd64 Packages

        500 http://ru.archive.ubuntu.com/ubuntu xenial/universe i386 Packages
apt-get install terminator
3. Close all terminator windows and relaunch the app
That's all. But you can see, that something changed. Colors of fonts, font, font size, color scheme, title bar name and so on.
